
Many children with autism need effective communication photos for visual support.
I’m a speech-language pathologist who has young children with autism on my caseload. I am also a friend and family member of people with autism. I have seen how using visual supports for children with autism can make a huge difference.
Years ago, there was one sweet little boy with autism I knew well. He would get very upset and have huge meltdowns when his mother ran too many errands with him in the car. He could tolerate one or two stops, but no more than that. I helped mom make a visual schedule by taking photographs of the storefronts of her usual stops, and making a visual schedule with the photos for running car errands. It helped tremendously. Photos work!
Photos are a great tool for working on communication skills with young friends with Aatism who are not yet speaking.
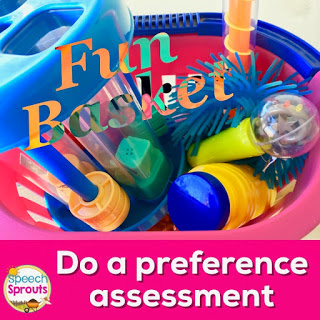
I have a basketful of nifty toys. I begin by allowing my little friend to explore the toys. I want to see what he will enjoy and find motivating. We then use the preferred toys in therapy. I want my visits to be fun and establish rapport before moving on to more challenging activities.
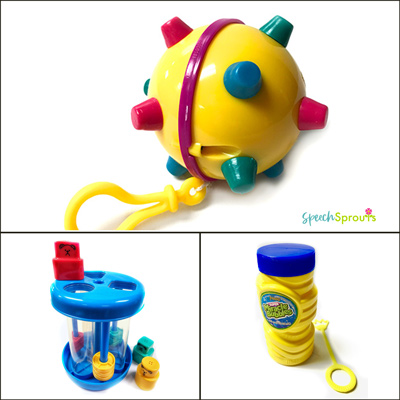
I can target many goals with my basket of bubbles, vibrating ball, rainstick, a noisy shape shorter, a light stick, wind-up toy and more goodies. For students who are non-verbal, I begin by encouraging them to engage more in interchanges with another person, take turns, increase shared attention and move toward requesting. When it goes well, we are soon calmly waiting our turn instead of crying.
We establish a little play routine. I use lots of pauses while playing and watch to see if my little friend is anticipating what comes next. My friend looks at the toy, then at me, then back at the toy. I love when he shifts his gaze to look me and see if I am about to deliver the goods! Great stuff, we are laying the foundation in becoming a communicator.
Time to work on requesting with a picture exchange. But we need communication board pictures!
I’ll be introducing my friend to requesting using a picture exchange. He’s not yet ready for understanding symbolic pictures, so I need communication photographs of his favorite items. This is where I love having learned a few things about photography using my iPhone! So… I took these photos to make a communication board. We’re all set. You may be wondering, How did she that great white background and eye-catching contrast?”
I’m going to show you how to take great object photos with just your smartphone.
I own an iPhone but you can get a great shot with a good android phone too. I wanted a well-lit shot with no distracting background. Much easier to understand. Here’s how you can do it:
Take the Photograph.
- Use a white backdrop. You can place your table against a white wall or better yet, use white poster board or a sheet of white paper taped to a vertical surface and curved like this photo of the little alien.
- Try to use bright natural light, but not direct sun. Near a large window is great. If you don’t have natural light, try two lamps pointing at the object from opposite directions to help eliminate shadows. Forget the flash, it’ll make harsh shadows
- Get close to your subject. Using the zoom on many cell phone cameras will make your picture grainy. Get closer instead.
- Be sure your camera lens is clean- wipe with a soft cloth.
- Try lowering your phone/camera to the level of the table instead of an overhead view. Figure out the best angle for your subject.
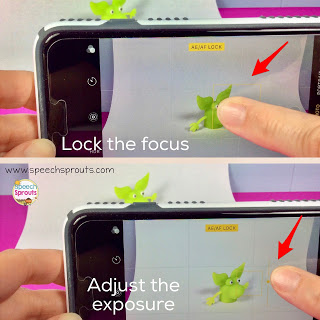
- If you own an iPhone, lock in the focus on your subject by holding your finger down. You will see a yellow box and it will say AE/AF lock in yellow on your screen.
- Adjust the exposure by sliding the little yellow sun up or down… Be careful not to over-expose.
- Now hold still (I hold my breath) and shoot!
You may have a terrific shot that you’re happy with now.
If not, you can edit it a bit. This might seem a little daunting at first, but once you do it a couple times, you’ll get the hang of it!
You can use the built-in editing features in the iPhone (which aren’t bad) or an editing app. Snapseed is a free app that’s awesome for editing, and it’s not too hard to learn.
Editing your photo with the built-in features on your iPhone:
You can do some basic editing with the features right in your iphone. Open your picture in Photos, click “edit” at the top You’ll see icons below your photo that you can slide through. As you touch each one, the label pops up to tell you what it controls. From there you may want to adjust a few things to whiten the background a bit. Try making small adjustments by sliding the bar below the icon. You can adjust:
- Brilliance
- Highlights
- Contrast
- Shadows
- Brightness
You can also try adjusting:
- Exposure if the shot is altogether too dark.
- Warmth: make it a bit more blue if your whites look yellowish.
- Finally, you can add a bit more saturation if needed to make the colors pop more
Editing with the Snapseed App
Snapseed is an awesome photo editing app that’s free to use with a ton of features. If you want to learn to edit with Snapseed, this tutorial on the iPhone Photography School blog can get you started. Learning it is more than I plan to cover today, but definitely worth it if you love taking pictures with your camera phone.
In Snapseed, you can adjust your white balance if your shot is too yellow. Here’s my super secret for getting a bright white background with little to no shadows: use the brush tool, and overexpose just the white background to make it brilliantly white and eliminate shadows. You do this with your finger!
Setting up and editing your photos may take a bit of time to learn at first, but is terrific for creating those “no background” photos for your choice boards or AAC devices that really help your student focus on what the image represents. As an added bonus, you will learn some great tricks to making your other smartphone photos extra beautiful!
Completely removing the background of your photo
A great way to get a perfectly white background is to remove the background and leave the background transparent. Then when you layer your photo on a white page, it will be brilliantly white. Pictures that this works best with have:
- A solid color background
- Clear, sharp images of the subject
- No overlapping elements
Removing the background on your phone
If you have a solid background with a contrasting subject, you may get pretty good results completely removing the background from a number of apps.
My favorite app for removing the background on your phone is the free Adobe Express app. You can get the app for both iOS and android phones and tablets.
You can also remove the background on your desktop
On desktop, you can upload your image to these sites, then download when finished.
Adobe Express does a great job with details, and the background removal tool is included in the free version. Adobe express also has an app so you can do this on your phone or tablet- both iPhone and android phones.
Canva Background removal is free if you have a Free Canva for Education account or a paid premium account. Canva also has an app for both iPhone and android phones.
Fotor -upload your image, click remove background, then download. Fotor does a pretty good job, But it can miss some fine details. It does have a brush tool to modify the removal a bit.
Create your choice board with your communication photos
Now that you’ve edited your photo or removed the background on your phone, send your photos to your computer. If you have a single photo, it’s pretty easy to email it to yourself. If you have several, you may want to upload them from your phone to Dropbox or your Google drive, then access them and download when you get back to your desktop computer.
If you have Boardmaker, you can import your pictures and use them in the program. Here’s a tutorial from Boardmaker.
I made my board in PowerPoint. Give it a try if you don’t have Boardmaker. Do NOT use Microsoft Word, trust me on this, you will get frustrated!
Don’t worry, if you are unfamiliar with PowerPoint, I have a free PowerPoint template for you HERE. Just open it in powerpoint, and save to your computer.
If you want to do it yourself, here’s how:
- Email yourself your photos, or upload them to a service like Dropbox, and save to your computer.
- Open a new file and draw a table with the number of cells you need. Format it to have no fill and all borders showing. Change the dimensions of the cells to be the size you need. I made mine 2.5 inch squares. Center your table on the page.
- Now click insert picture and insert one of your photos. You can re-size, crop, and move your photo into one of the squares. You can add text by clicking on a cell and typing. When finished, print! (if you have any trouble printing in Powerpoint, click Save As and save as a pdf file before printing.)

By the way, this shape-sorter is awesome. The shapes make noise going down the tubes, and my kids love the silly noises. If you want one, you can find several vendors by searching “noisy shape sorter”.
Here’s how my choice board turned out.
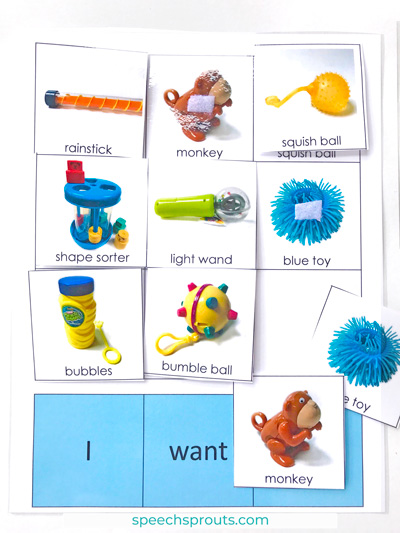
This board encourages matching. I also made a mat without pictures – so I can change and move around the photo choices.
I can’t wait to try these communication photos out with my young friend. Let me know if you give it a try.
Read my next post for more templates and Ideas:
Autism Supports: Free Templates to Easily Create Picture Exchange Cards in Powerpoint